The combination of stable and durable brick pillars with filling spans from a profiled sheet, metal fence, welded or forged sections is the most optimal option for fencing the site. Such a fence looks solid, and the cost of arranging it will be much lower than when building a completely brick fence.
The construction of brick pillars for the fence with your own hands does not belong to complex work, but it allows you to save significant money. It is only important to observe the construction technology and use high-quality materials.
General rules for the organization of construction
The construction of the fence around the site should begin with the preparation of a project, in which it is necessary to indicate the location of all structural elements of the fence with reference to existing structures or landmarks. When drawing up the project plan of the fence, it should be borne in mind that:
- the line of the fence under construction should not go beyond the boundaries of the site;
- the distance between the posts is not more than 3 meters, with the exception of the installation sites of gates and gates;
- the number of horizontal lags is determined depending on the height of the structure;
- in areas with complex relief, the fence is assembled in the form of separate sections installed at different heights;
- the design and depth of the foundation depends on the type of soil and the depth of freezing.
In accordance with the project, the necessary materials are purchased, marking and installation of brick poles is carried out.
The choice of support base design
A correctly made foundation will ensure the stability of the fence under strong wind loads and the mobility of weak or heaving soils. This will make the fence reliable, durable and free the owners of the site from the need for periodic repairs. For the construction of a fence with brick pillars, the following types of support bases are used:
- columnar
- tape
- pile.
The choice of design is determined by the type of soil, the level of groundwater and the weight of the material filling the spans between the posts.
The most stable support for fencing of any type is a shallow-deep strip foundation of concrete monolith.
When using lightweight materials to fill the spans between the supports, on dense, stable soils, it is allowed to use steel pipes that are simply driven into the ground or installed in an excavated hole and sprinkled on the sides with rubble. However, for brick pillars, the foundation is a must because of the heavy weight of this supporting structure.
Materials for masonry
In order to make the fence look beautiful, and the supports are strong and reliable, it is necessary to use high-quality materials.
Brick selection
The brick used for laying pillars differs not only in grade and workmanship, but also in appearance. So which brick to choose for fence posts? It can be a regular clay stone with smooth ends and internal voids for light weight. It is affordable to most developers and has an attractive appearance.
Decorative items with a textured end surface look more original. In addition, such a brick is characterized by higher strength, durability and high resistance to environmental influences.
However, this material is much more expensive. Therefore, you can often see options for the combined use of ordinary clay bricks and decorative textured stones, which are laid every 2-3 rows or in a different order.
Solution preparation
The optimal ratio of cement M400 and sand for the preparation of masonry mortar is 1: 5. An increase in the amount of cement will lead to an unreasonable increase in the cost of acquiring materials, and a decrease will reduce the strength of the building structure.
To improve ductility, you can buy a plasticizer or add liquid soap at the rate of 25 grams per bucket of solution. Adding soot will allow you to get a mixture of black, which will look more original in the masonry.
The quality of the masonry depends on the density of the prepared cement-sand mixture. The solution should not be excessively liquid, but it should not be used too dry. During the preparation of the solution, water should be added gradually until a mixture of the required density is obtained.
To test, put a small amount of the finished solution on a flat sheet, and make a not very deep cross incision on top. Then shake the sheet slightly. For a good mixture, the cut lines should converge, and the solution itself will not spread over the surface.
Work order
The whole process of building pillars for the fence of brick with your own hands can be divided into several stages, which include:
- cleaning of the territory from vegetation and marking;
- excavation;
- formwork installation;
- assembly of reinforcing cage and vertical installation of steel pipes;
- concreting;
- masonry of brick pillars for the fence;
- installation of filling spans and installation of gates.
Work must be carried out in that order. Moreover, at each stage it is necessary to do the full amount of work on one straight line of the fence. After that, proceed to the next section. This will significantly reduce construction time, reduce labor costs and provide a higher level of quality.
Markup
Before starting the marking of the installation sites of the poles and the axis of the fence, it is necessary to take a topographic plan of the site and draw a diagram of the future fence on it. It should be borne in mind that;
- the fence should not extend outside the territory of your territory;
- the distance between the posts is not more than 3 meters;
- gate width up to 5 meters, gates up to 1.2 meters.
Having a graphic diagram of the future fence on hand, marking up will not be difficult. In the places of installation of the poles, you need to hammer the pegs and pull the cord along them, which will accurately indicate the line of the fence.
Excavation
The volume of earthwork depends on the accepted foundation design. Most of the land will have to be removed if the type of soil requires the installation of a shallow strip foundation and pillar supports in the form of a concreted vertical pile.
In this case, under each pillar, you need to dig a hole measuring 500x500 mm deep 150 mm below the freezing point of the soil or drill a hole with a diameter of more than 350 mm.
Between the pits, dig straight sections of trenches with a width of at least 300 mm and a depth of 400-450 mm. At the bottom of the pits and trenches, pour a layer of sand 100-150 mm thick and compact it well. On top of the sand you need to pour a layer of rubble and also compact.
Formwork installation
The formwork fence along the walls of trenches and in prepared pits for poles is necessary in order to provide the opportunity to create the exact form of the foundation structure. In addition, the installation of formwork will reduce the consumption of concrete mixture during pouring and exclude the escape of water from concrete into the ground. The height of the installed sheets must be at least 100 mm above the ground.
To assemble the formwork, you can use any sheet material of sufficient strength. Fix the position of the sheets using plastic, metal or wooden spacers 300-400 mm long, which must be installed between the opposite sheets. On the other hand, the formwork can be strengthened by adding excavated soil.
Reinforcing frame assembly
The strip foundation, in its essence, is a set of horizontal beams supporting columns and connecting them into a single monolithic structure. Therefore, such tape sections should be reinforced with steel or polymer rods.
The reinforcing frame of the foundation is a spatial construction of a square section of 4 longitudinal rods of 8 mm, wired to the corners of square blanks of round reinforcement with a diameter of 6 mm. For the manufacture of such blanks, it is recommended to make a template from ordinary nails hammered into the board. The frame is easier to assemble on the surface and then lower it into the trench.
Attention! The fittings should be at least 50 mm from the formwork and the bottom of the trench. This will ensure its protection against corrosion and mechanical damage.
During the assembly of the reinforcing cage, for each column, install vertically a metal pipe with a cross section of 65x65 mm or a diameter of 76 mm. The height of the pipe should correspond to the height of the column and will continue to play the role of a supporting rack associated with the foundation.
Concreting
The foundation is poured with concrete of grade no lower than M200. With small volumes, you can cook it yourself. Otherwise, it is better to order the material in a centralized delivery company. Concrete itself will cost a little more, but you will save on reducing the number of physical work and get a mixture of a guaranteed brand.
The setting process of concrete, before the start of masonry, is at least 72 hours. In hot sunny weather, it is recommended to cover the poured concrete with plastic wrap to prevent premature evaporation of water.
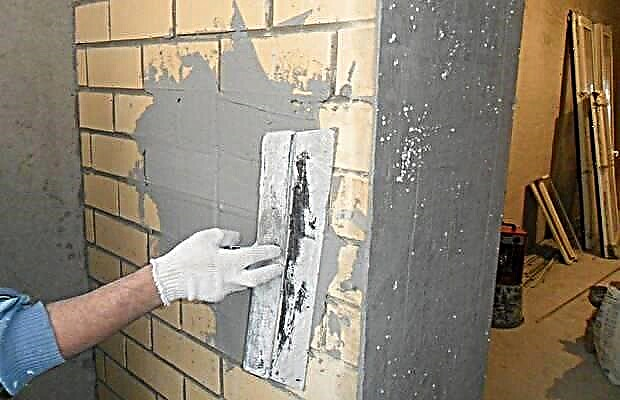
Brickwork
The classic size of the pillars for the fence is masonry 1.5 × 1.5 brick with a cross section of 380 × 380 mm. 4 bricks go into each row. Masonry is carried out with obligatory dressing, the seam of the lower row is necessarily blocked by a whole stone from above. The thickness of the seams is 8-10 mm.
On a prepared foundation, lay a waterproofing layer of two layers of roofing material or hydroisol. It will protect the brick from moisture from the soil and prevent its premature destruction. Roll materials can not be used if the surface of concrete is treated with bitumen soil and poured with a layer of molten bitumen.
For waterproofing, lay a layer of masonry mortar with a thickness of a little more than 10 mm. After that, lay 4 bricks in the form of a closed square on it. Please note that the distance from the bricks to the vertical pipe must be the same on all sides. The empty space between the tube and the stone should be filled with mortar with the addition of small stones or brick fragments.
The second row is laid in the same way, but with the displacement of the vertical seam for dressing. The solution is laid on a brick so that the layer does not reach the edge by 8-10 mm. Planting a stone in place is best done with a rubber mallet. When you hit the trowel with a pen on the finish surface of the brick, mortar can get in and it will be quite difficult to wipe it off later. Vertical joints are filled with mortar after the top row of bricks has been laid.
In order to ensure a constant, uniform thickness of the joints, a metal bar with a thickness of 8 or 10 mm can be used. It is laid along the edge of the upper row, the solution is spread out, the next row of bricks is laid and the bars are removed. After laying each row, it is necessary to check the correspondence of the column vertically and horizontally using the building level.
To enable installation of filling spans, it is necessary to install embedded parts. These are small steel plates to which a bar with a cross-beam 8-10 mm thick is welded. Each pillar requires 4 mortgages. They need to be installed in 2 pieces on opposite sides.