Many owners of country houses are trying to make the attic a full-fledged living space. One of the requirements for such premises is access to fresh air, as well as the proper level of illumination. Both problems can be solved at once by installing a window in the roof. This solution is very popular today and most often for this task the owners prefer to hire third-party artists, although you can do it yourself. So how to install a skylight?
Installation of roof windows
The following components are most often included in the package of delivery:
- sunroof or roller blinds for external dimming;
- salary for protection against negative atmospheric influences;
- the window itself is a closed sealed system;
- waterproofing sealant;
- internal slopes.
Of course, on sale you can find more modest kits, but it is recommended to choose the option with built-in curtains. Due to the fact that the design itself will be located at an angle, the classical means of dimming may not be effective.
Planning and Settlement
Installation of the dormer-window in the finished roof should begin with the planning stage. First of all, you need to calculate the required dimensions. The formula for the calculation is quite simple: 1 square meter of glazing for every 10 square meters of the room.
It is also required to choose the correct height at which the windows will be installed. The location of the skylights should be selected so that the lower part of the frame rises above the floor by 1-1.5 meters.
The choice of the installation location of the dormer-window in the metal tile or soft roof and dimensions should be done so that, if possible, not affect the rafter system during installation. Dimensions should allow to mount the window box between the rafters and leave a margin of about 10 cm.
Work plan and tool
Whether it is installing a skylight in a soft roof or a metal tile, with any option, the installation instructions are as follows:
- opening preparation;
- frame installation;
- heat and waterproofing;
- drainage system preparation;
- installation of salary details;
- installation of a double-glazed window;
- interior decoration, including installation of slopes and vapor barrier.
Installing skylights with your own hands is a feasible task, but the master will not be able to do without a suitable tool:
- screwdriver and screws;
- wooden slats and timber;
- level;
- nails
- materials for heat and waterproofing.
Window mounting
After the place for installation of skylights is selected, you should pre-mark the planned site for work. Following the outline in the material, several holes are made for unloading the materials of the roofing cake - this will help to avoid damage to them in the process. Cut the opening with a circulation or band saw. It is important to cut along the diagonal, and not along the contour, after which the vertices of the resulting triangles are cut off and only after that an opening is formed.
Separately, it should be noted work with roofing material. Installation of skylights in a metal tile is carried out similarly, as well as in the case of corrugated board or sheet metal. If we are talking about skylights in the seam roof or similar materials, then the lining will need to be disassembled first.
Frame Installation and Adjustment
Important: for safety reasons, frames are mounted without glass. It can only be installed in the final stages..
When mounting the frame for the skylights, the lower brackets should be carefully fixed immediately, but the upper mounting should not be tightened to the end - this will then make it easier to adjust the sash. This is done using a level. If any deviations of the inserted window are found, they should be eliminated with the help of plastic corners - these spare parts are often supplied. It is also recommended that the glass be inserted into the frame briefly to check the installation quality. Once the adjustment is complete, tighten the screws.
Insulation and drainage
After the fasteners are securely wrapped, heat and waterproofing material will need to be laid around the frame for greater tightness. Fixation of the waterproofing apron is performed using a stapler.
A drainage trough is made at the top of the frame. In the crate, two pieces are cut right above the opening to fit the size of the drainage gutter. A similar size is prepared and a piece of waterproofing material. The gutter is started under the cutoff of waterproofing and is attached to the crate. It is necessary to install it necessarily at an angle, otherwise the seal will suffer - rain water can go through the window.
Salary setting
Today, two main types of salary are used for different folds. The first is used to work with flat roofing material, the second - with wavy. The companies engaged in the manufacture of dormer-windows in the industry apply salary in the delivery set. At the same time, the principle of working with both types is identical.
The first step is to attach the lower part of the attic window salary. It should be installed in such a way that the waterproofing apron extends beyond the frame itself and the roof sheets. Then you should go to the side components. The edges of these elements should be laid on the frame itself.
The seal is laid on the outside of the frame. Most often, it, fasteners and all other accessories are included in the delivery, but in some cases they will have to be purchased later. In any case, after these steps, you should carefully check everything for accuracy and strength, because replacing or repairing dormers if necessary will cause a lot of trouble.
Double-glazed installation and interior decoration
At the next stage of installing dormers, it will be necessary to return the double-glazed window back to the frame. This is done quite simply, but the technology depends on the manufacturer, so the process itself is exhaustively described in the manual.
Also, the interior decoration of the skylights should not cause problems - it all depends on personal preferences. In addition, many manufacturers also add special cladding solutions to the roof windows. Most often, the kit includes a sealant, a miter box and a template. Such templates are equally well placed and removed if necessary.
As an alternative, you can use ordinary drywall, but from mechanical installation structures in this case should be abandoned.
Features of the attic window insulation
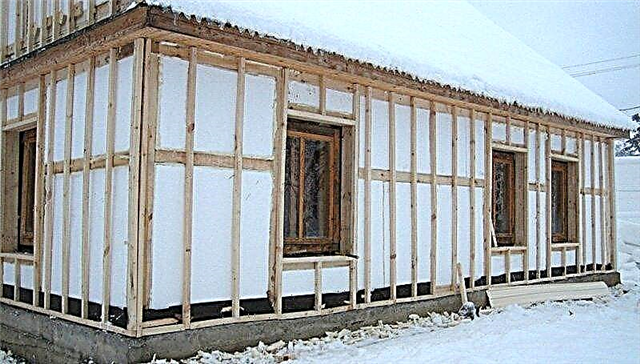
About working with insulation on the roof should be said separately. Very often, improper insulation of skylights turns into many problems with its operation. Many inexperienced builders prefer to use ordinary mounting foam for insulation. Do not do this: expanding the material can lead to distortions and insulation problems.. Correct installation technology recommends the use of materials in the form of stone wool mats with a high service life.
As an additional measure, it is highly recommended to install heating devices under the roof window. The flow of warm air with equal success and the window slopes warms up, and protects from condensation. Metal elements for installing insulation should not be used - they can form cold bridges.
This is all you need to know about installing a roof window in a soft roof or tile. Despite the apparent difficulties, the process itself is quite simple and requires not so much skills as time.