Apartment for dolls is often expensive, made of plastic - a fragile, rapidly breaking material. The article describes how to make a toy house with your own hands.
To fulfill a child’s dream of a house for a beloved doll, it is not at all necessary to go to the store. You can make a cottage from plywood on your own project.
Arguments for DIY
Why you should build a home-made dollhouse out of plywood:
- Individuality. The project will be unique.
- Teamwork with a child. Helps strengthen family relationships.

- The development of creative abilities, skills, motor skills, the acquisition of new experience by children.
- The ability to create a house of any size.
Why plywood
Dollhouse is made of different materials. The best option is plywood:
- Using plywood for construction provides the strength of the future home. With good fastening, the parts do not fall apart, do not break off.
- Plywood is easily processed with conventional tools.
- Wooden toys are pleasant to the touch.
- The beautiful appearance of the tree allows you to do without additional design, surface design.
- Low cost of material.
What to look for
In the production of plywood, formaldehydes are used. They are part of the impregnating adhesive for connecting the fibers. To avoid poisoning, the ingress of hazardous material into the nursery, you must pay attention to the labeling of the sheets:
- E0 - less than 6 mg of formaldehyde per 100 g of product;
- E1 - 7–9 mg per 100 g;
- E2 - 10-20 mg per 100 g.
Furniture and its components should be made from the safest class of plywood - E0.
How to do
Making a house for plywood dolls is a multi-step process. A certain sequence of actions is required. To facilitate the work, you can use the step by step instructions.
Stage 1. Preparation of the sketch
The scheme should display the layout, the dimensions of the floors in length, width, height.
You can find a sketch on the Internet, adjust it. The photo shows several diagrams of the basics of a toy house.

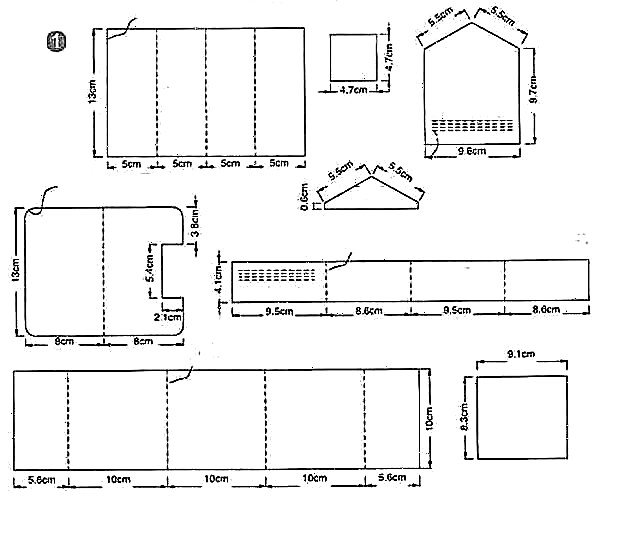

The most important thing is maintaining proportions of scale. This is necessary in case you want to change the dimensions of the product during operation.
Design can be thought out in advance to purchase and prepare the necessary materials for the decor.
Stage 2. Preparation of accessories and tools
To build, you will need:
- Plywood. To determine its quantity, a drawing is used: the number of parts, their dimensions are calculated, the total surface area is obtained. Based on the result, get the right number of sheets. For a desktop house, 2-3 blanks will be needed; for a large mansion, up to 7-10 sheets of plywood can go.
- Corrugated cardboard for the roof.
- Tool for cutting wood. An electric jigsaw is recommended. It will help to quickly, accurately cut out the details of the desired shapes, dimensions.
- Joiner glue for fixing assembly elements.
- Mounting tape as an aid to fasten parts.
- Fine sandpaper.
- Roulette, ruler, marking pencil.

For registration you will need:
- PVA glue or silicate.
- Wallpaper, color films.
- Self-adhesive film to simulate flooring.
- Colored cardboard or paper for decoration of individual elements of the premises (optional).
Stage 3. Image Transfer
To assemble wooden parts into a single unit, they must be cut from a blank sheet. To do this, the scale sketches are transferred to paper, the finished parts are cut out of it, and then used as a template.
If windows are not indicated on the diagrams, when transferring patterns, they are drawn. On a flat house without a front wall, cuts for windows are not needed.
Stage 4. Assembly
Step-by-step assembly instructions:
- Parts transferred onto plywood are cut with an electric jigsaw. They try to do this carefully, without leaving the contour lines: in case of a design error, they may not connect correctly.
- Sand the edges to make parts safe and avoid injuries.
Cutting and edging should be done by adults.
- Assembly begins with the unification of the internal space. To the vertical end walls with glue and mounting tape, floors and internal partitions are attached according to the scheme. To strengthen the connection, the internal corners are glued with thin rails. They will give rigidity to the structure. At this stage, the child may be involved.
- Stair spans are made of wooden rulers. They are put in the form of slides or one is cut, a real staircase is glued from it.

- Attach the back wall.
- Gather the roof. Solid slopes can be cut out of cardboard and glued together. Another option is to collect the roof from individual pieces in the form of tiles.
The finished skeleton of the house is left for several days until the glue dries, the construction acquires sufficient strength.

After assembly, they begin to design.
Stage 5. Design
The finished frame is decorated and furnished with doll accessories. Recommendations:
- The floor can be left in its original form or decorated. Plywood has a wood pattern, so it is not practical to cover it with a similar ornament.
- You can make swing windows, doors. To do this, attach the canvas to pieces of cardboard or use small metal door hinges. The passages are covered with fabric cuts-curtains. Windows are sometimes replaced with cardboard shutters.
- The ceiling, walls can be glued with colored films, wallpaper, paint.
- The rooms have furniture for toys.
Additional functions
Not only the aesthetic, but also the practical side of the house is important: the toys must be stored somewhere, the accessories must be removed, something must be hidden. You can make additional built-in drawers in the upper or lower tier. This is appropriate if the house is large, occupies a significant place in the living room.

Boxes are also made of plywood.. The drawing provides a place for storage of things. The sides of the box are cut out of plywood and glued together. Screw the handle, insert into the department.
You can make a hinged door as in the photo. To do this, the cut out fabric is screwed onto metal eyelets.

Conclusion
DIY plywood toy house will be a good gift for any child.
The construction process will take 2-3 days, taking into account the preparation of blanks, their cutting, drying glue. The child can arrange the premises on their own.